
Managing your reverse proxies and SSL certificates by hand isn’t rocket science — but you need to know a bit. Between Nginx config files and Let’s Encrypt renewals, it can quickly become tedious. Nginx Proxy Manager makes all of this simpler and more visual.
What is Nginx Proxy Manager?
Nginx Proxy Manager is a tool based on Nginx that allows you to manage your reverse proxies and SSL certificates via a web interface. No more digging into config files!
What it allows (among other things):
- Create reverse proxies in a few clicks
- Generate and automatically renew SSL certificates (Let’s Encrypt)
- Manage wildcard certificates via DNS Challenge
- All with a clean and clear interface
It’s definitely more accessible and nice than editing files by hand.
My use case: Local SSL on the homelab
In my case, I use Nginx Proxy Manager for my homelab. My goal: have HTTPS on my local apps with my public domain name.
My domain name is hosted at Infomaniak, but I manage DNS via Cloudflare — mainly for this blog (Cloudflare Pages). So I might as well take advantage of it for Let’s Encrypt integration too. But Infomaniak could have done the job just fine.
Concretely:
proxmox.syspirit.fr→ Proxmox VEnginx.syspirit.fr→ Nginx Proxy Managerzabbix.syspirit.fr→ Zabbix- etc.
DNS records are managed locally on my Pi-hole, and I use a wildcard certificate *.syspirit.fr to cover all subdomains.
Installation with Docker Compose
Installation is simple with Docker. Here’s the docker-compose.yml:
services:
  app:
    image: jc21/nginx-proxy-manager:latest
    container_name: nginx-proxy-manager
    restart: always
    volumes:
      - ./data:/data
      - ./letsencrypt:/etc/letsencrypt
    ports:
      - 80:80
      - 81:81
      - 443:443
The ports:
- 80: HTTP — for redirections and Let’s Encrypt challenge
- 81: Administration interface
- 443: HTTPS
A quick docker-compose up -d and off we go!
For more details, the official documentation is well done.
First access
Once the container is launched, the interface is accessible at http://<SERVER_IP>:81.
Default credentials:
- Email:
admin@example.com - Password:
changeme
At first login, NPM asks you to create your own admin account. Do it immediately!
Creating a Wildcard SSL Certificate
To generate a wildcard certificate *.syspirit.fr, we’ll use the DNS Challenge with Cloudflare. This allows Let’s Encrypt to verify that we own the domain without needing to expose port 80 to the internet.
Create a Cloudflare API token
NPM needs access to the Cloudflare API to automatically create the DNS records needed for validation.
- In Cloudflare, go to My Profile → API Tokens → Create Token
- Choose Custom token
- Configure permissions:
- Zone → DNS → Edit
- Zone → DNS → Read
- In Zone Resources, select the relevant domain: Include → Specific Zone → syspirit.fr
- Create the token and copy it — it won’t be visible afterwards
Generate the certificate in NPM
- In NPM, go to SSL Certificates → Add Certificate → Let’s Encrypt via DNS
- Fill in the Domain Names field:
*.syspirit.fr - Select Cloudflare as DNS Provider
- Paste the API token in the Credentials File Content field in format:
# Cloudflare API token dns_cloudflare_api_token=0123456789abcdef0123456789abcdef01234567 - Click Save — NPM will create a temporary TXT record and validate the certificate
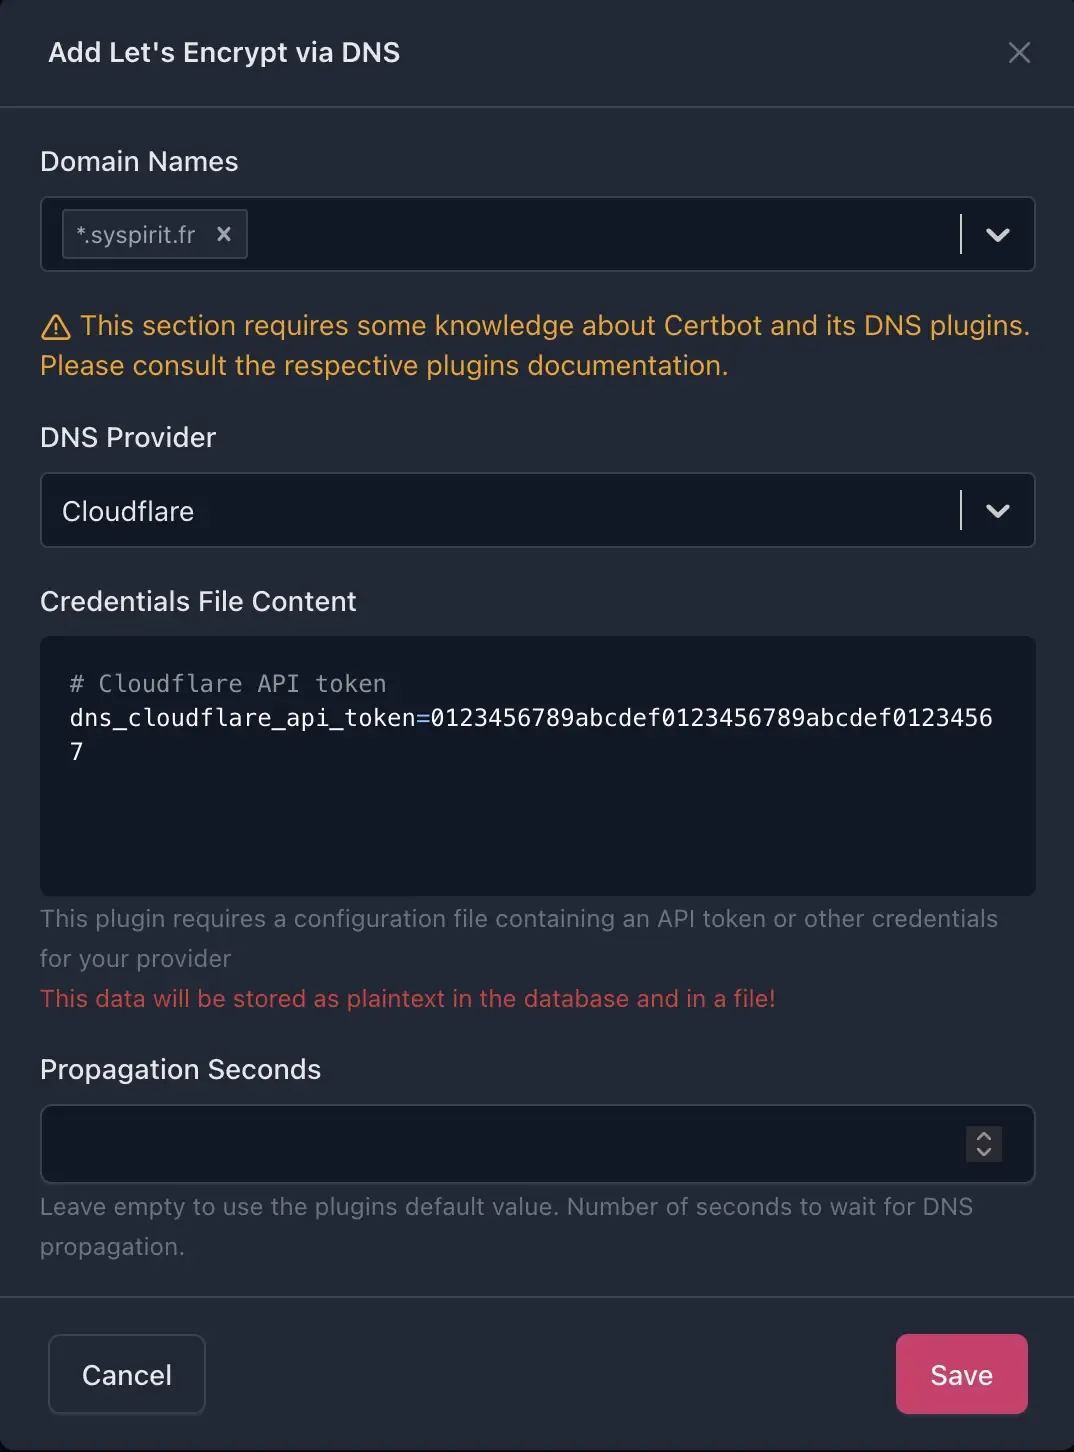
The certificate will automatically renew before expiration.
Creating a Proxy Host
Now that we have our wildcard certificate, we can create proxy hosts to access our services over HTTPS.
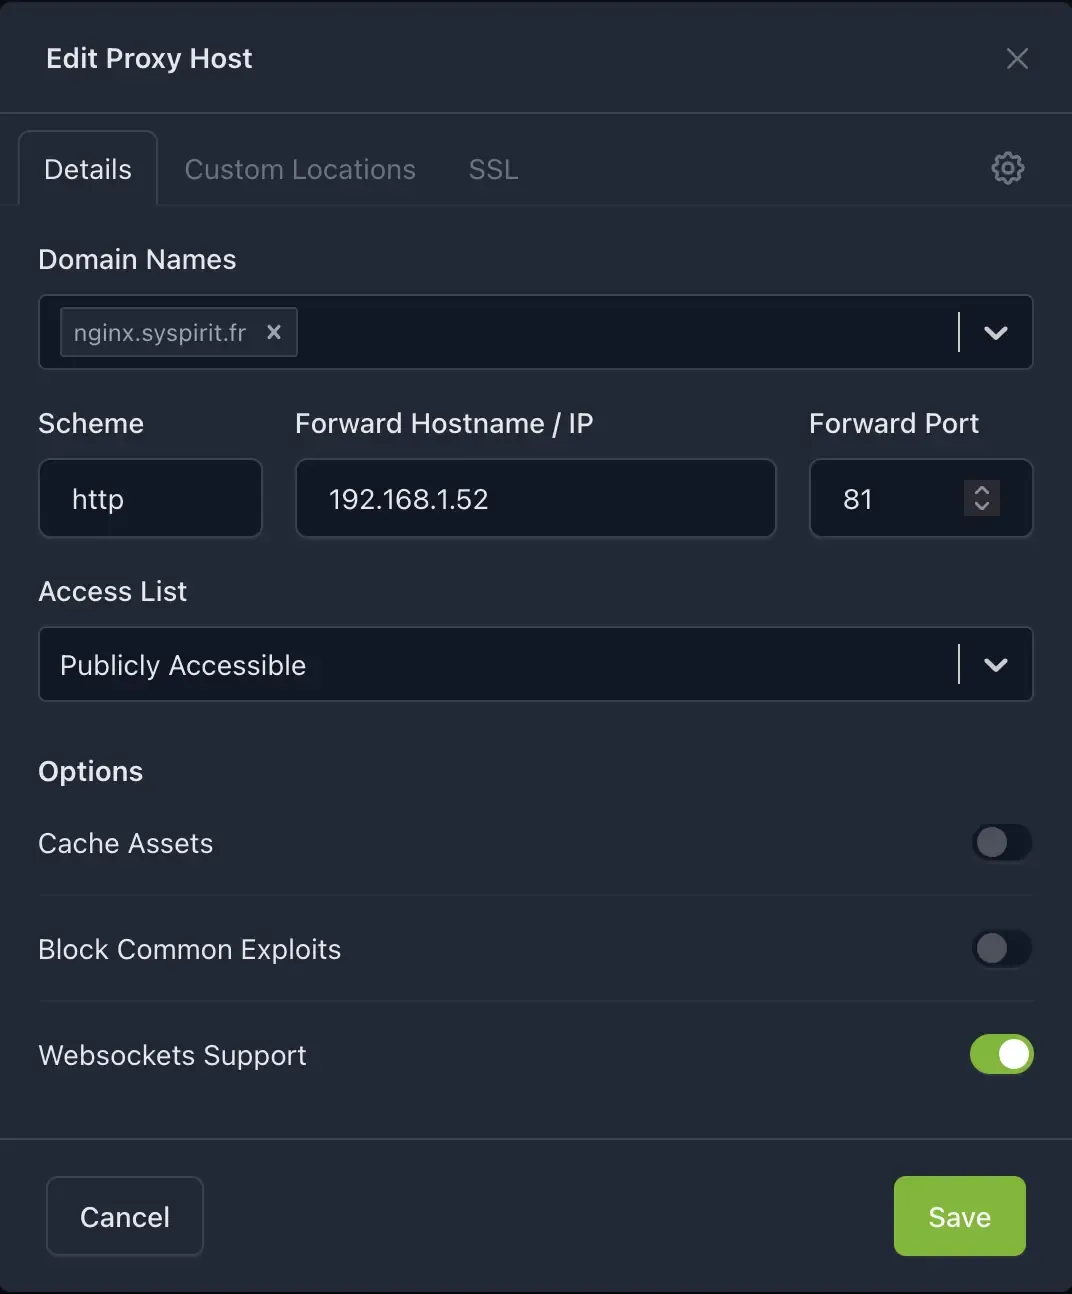
Let’s take NPM itself as an example: we’ll make it accessible via nginx.syspirit.fr.
- In NPM, go to Hosts → Proxy Hosts → Add Proxy Host
- Details tab:
- Domain Names:
nginx.syspirit.fr - Scheme:
http - Forward Hostname / IP:
192.168.1.52(the server IP) - Forward Port:
81 - Websockets Support: enabled (useful for NPM interface)
- Domain Names:
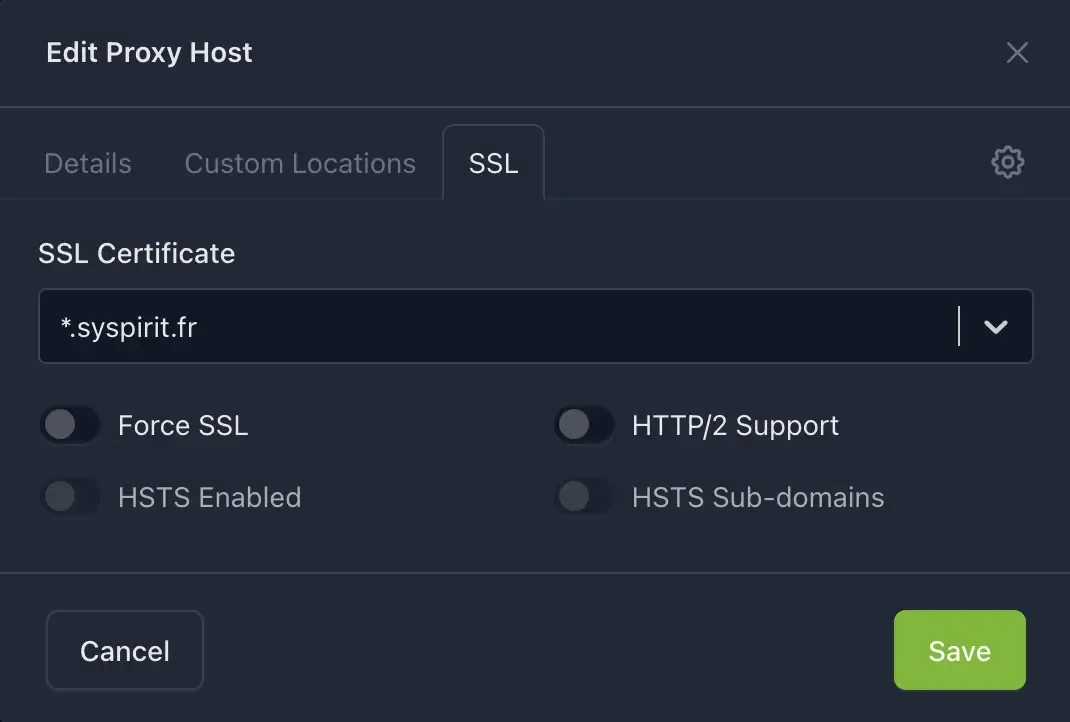
- SSL tab:
- SSL Certificate: select the wildcard certificate
*.syspirit.fr
- SSL Certificate: select the wildcard certificate
- Click Save
The reverse proxy principle: all subdomains must point to NPM’s IP. It then handles redirecting to the right service based on the requested domain.
In my case, I add on Pi-hole:
nginx.syspirit.fr→192.168.1.52proxmox.syspirit.fr→192.168.1.52zabbix.syspirit.fr→192.168.1.52
Always the same IP (NPM’s), regardless of the service. Without this, the subdomain won’t be resolved locally.
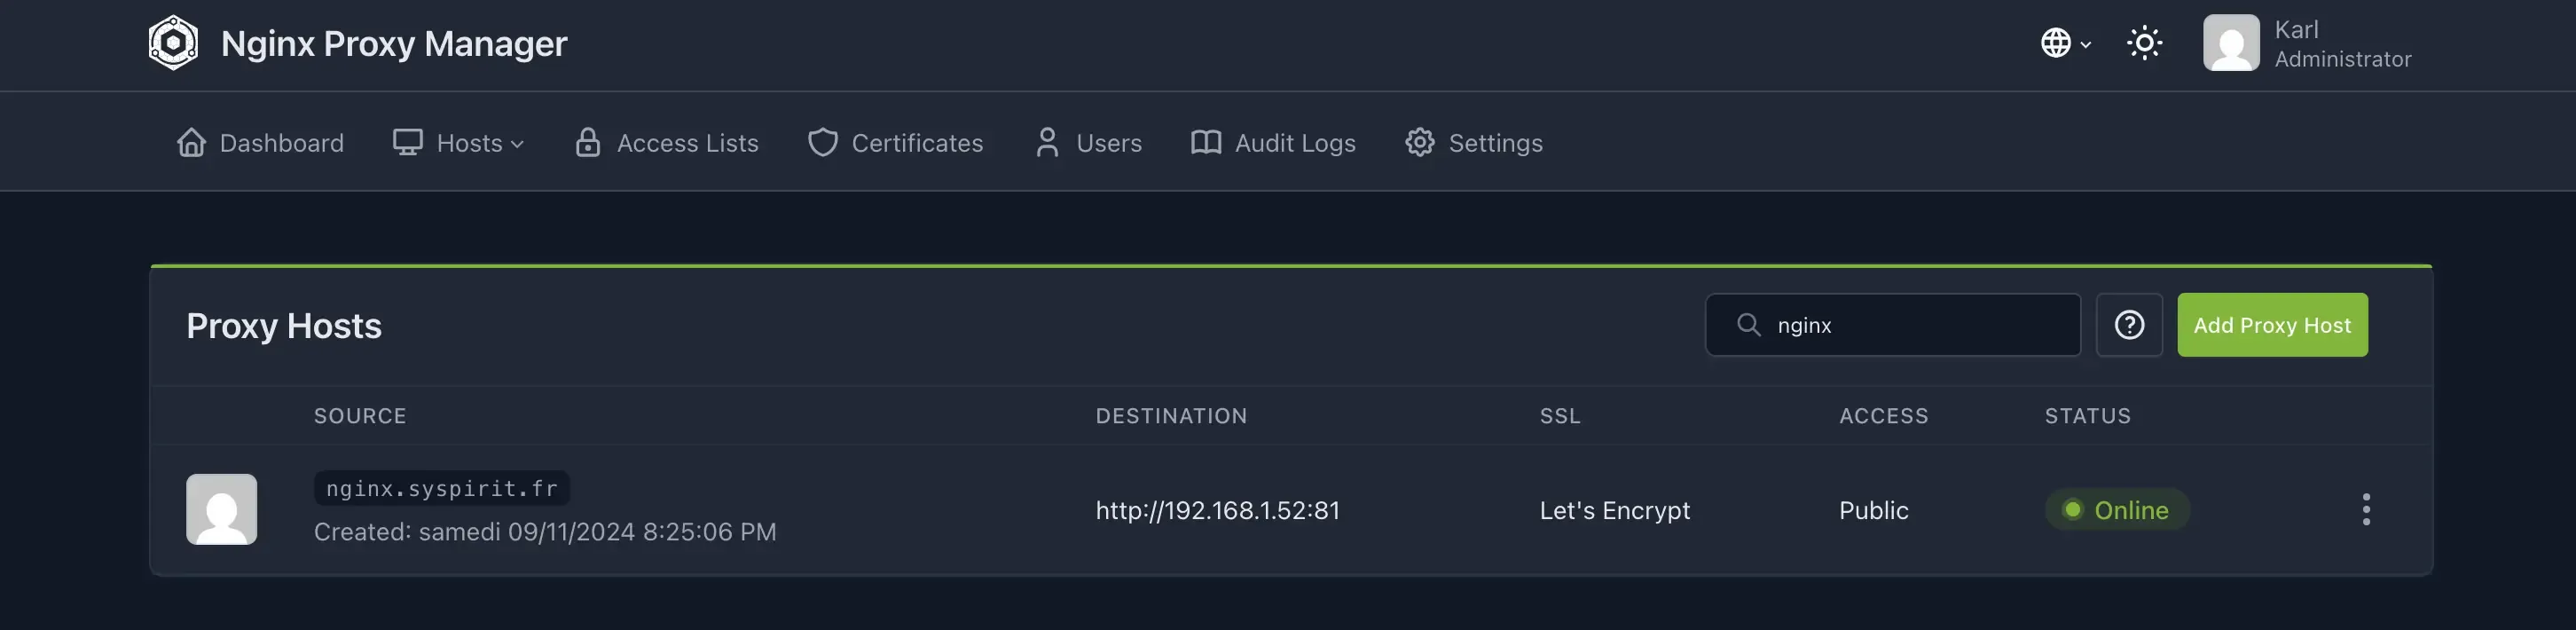
And there you go! https://nginx.syspirit.fr now points to the NPM interface with a valid certificate. Just repeat the operation for each service, adapting the destination IP/port in NPM.
Conclusion
Nginx Proxy Manager really comes in handy: no more juggling with Nginx config files or managing SSL renewals by hand. For a homelab, it’s frankly ideal.
And in a business environment? It can do the job too, especially for internal applications or less exposed environments. NPM is still based on Nginx, which is itself a proven and widely used reverse proxy in production. The difference is just the graphical interface on top.
For those who prefer the command line or need very specific configurations, classic Nginx, Traefik or HAProxy remain solid alternatives — but you’ll have to get your hands dirty.
Useful links: